The Level Editor for Nintendo DS requires a homebrew-ready NDS console or compatible hardware (DS lite, DSi, DSiXL), including a linker that supports DLDI.
First, download the software at SourceForge. Create a "moving" directory at the root of your media card (usually SD or micro-SD) and unpack the "frogatto-dirt.spr" file here. Copy LevelEditor.nds on the card wherever you like it best. Boot the console and launch LevelEditor. You'll see a small "<go>" button at the bottom of the screen. touch it with the stylus or just press the [START] button of your DS.
(download mirrors: dev-fr.org)
Your first map ...
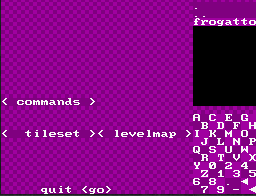
A view of your file system now appears. Before you start editing your first map, you need to select the tileset (graphics) you will use. Touch the <tileset> button and then "frogatto" on the directory view. You then need to pick a level map or create a new one. Touch the <levelmap> button once, which will say "create". Use the D-pad to select the size of the level that you will create (in tiles. one screen is 32x24), and touch the button "<create>" to validate the size. An "edit" button has now appeared at the bottom of the screen, indicating that the editor is ready. Touch it.
Editing a map -- draw mode

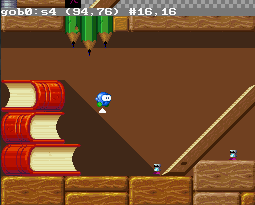
You can move across the level while holding the [L] trigger button and pressing the D-Pad. The location (in tiles) is mentionned on the status line, at the bottom of your upper screen. It also mentions the current mode (draw) and the block size ([16x16 pixels blocks]).
- [START] : brings you back to the file window
- [SELECT] : toggles foreground/background edition.
- [B] : toggles between 16x16 and 8x8 pixels block for edition.
hint: when drawing a large structure, keep your stylus on the screen and slowly swipe it. As soon as a new tile appear, use the DPAD to adjust the tile you want to see at this position. E.g. move the stylus to the right, press right direction on the DPAD, move to the right again, press the DPAD, move down, press DPAD in [DOWN] direction, etc.
Map Edition -- copy mode

If you press L and release it without touching anything on the screen, you switch the editor in 'copy' mode, which can be identified by the cyan colour of the upper screen. While the draw mode always repeat the same tile, the "copy" mode can duplicate pre-existing structures either from the tileset or from the level map.
- L-touch a corner of the structure you want to copy
- copy the structure by swiping the target location with your stylus. As long as the stylus keeps touching the screen, the editor remembers the origin of your swipe and select the tile to copy accordingly.
- lift up the stylus and swipe to another place to do another copy of the structure, or just to extend it.
Exploring the tileset.
SEDS let you edit graphics on a 64-pixels wide "page" and one .spr file can hold several of those pages. LEDS' "tileset screen" can show 3 pages at any time, but when the tileset screen is on the touchscreen, you can use the "prv" and "nxt" buttons on top of each page to navigate through the whole tileset and pick more objects to draw.
Saving your work.

- Press now "save" to actually write your map to your SD card.
- You can keep editing by pressing "edit".
- You can't "play" your map yet at this stage.
- "quit" sends you back to the runme tool for upload/download if you have it installed.
Create a level
To be able to do more and use your map in a level, you will need to set up a command file that is parsed by the GEDS game engine. It's just a text file with custom commands. Your minimal command file will look like
bg0.load "../spritea.spr"
bg0.map "school0.map" 128 128
bg1.map = bg0.map:1 128 128
# more commands could come here
print "ready"
endThese just bind a .spr file holding the tileset and a map file previously created with LEDS. The level editor as well as the game engine will interprete filenames relative to /moving/ directory. The two 128 128 numbers are the coordinates (in pixels) where the camera will initially stand. The "bg1.map = bg0.map:1" states that the second tile plane should reuse the map defined by bg0, but load the background layer. That should be present whenever you use both foreground and background layer in LEDS.
More commands are available to place monsters, define locks/keys, etc.
For instance, if you have a monster defined in the file blador.cmd, you can instanciate a monster in your level with
spr.load "../spritea.spr":1
input "blador.cmd"
import state 0..1
gob1 :state0 (100,100) e
the spr.load instructs the game engine to load the sprite VRAM with the second tileset available in spritea.spr (those that show 'extra' in SEDS page selection screen). The input statement then forces the parsing of a side file where the behaviour of your monster is defined. This essentially defines a number of states (walking, idle, falling ...) linked together by some transitions. The monster .cmd file and level .cmd file have their own palette of states. the import state 0..1 statement copies the first two states in the monster palette on the level palette. This way, we can create new "blador" monsters in two initial state (e.g. facing left or right).
The "gob1" statement will create a new monster at level coordinates (100, 100), and specifies that it's an ennemy.
Placing monsters
 press R to switch to 'monsters mode'. touch a monster to select it, the small arrow is the "ground contact point" of your 'monster' press R to switch to 'monsters mode'. touch a monster to select it, the small arrow is the "ground contact point" of your 'monster' | ||
| the small arrow indicates the "floor contact point" |
Once you have this boilerplate in place, you can add new monsters and move them around in the level in LEDS, without having to type coordinates by hand. Once on the file selection screen, tap the "<commands>" button and then select the name of your level .cmd file. If the file is properly parsed, the name of the tileset and map will be automatically filled and you can jump to edition.
Once in the editor, press R to enter the monster mode, and R again to leave it. In monster mode, the top screen fades to grey. You can select any monster on screen by tapping it. The actual location of its floor contact point is then revealed with a little triangle. You can move the sprite around either freely with L+touch or adjust the location on the tile grid using the DPAD.
You can duplicate your current monster with the [Y] button, or delete it with [X]. [A] and [B] allow you to navigate through state numbers, and thus change the type of monster you're placing.
Coming soon
These features are already supported by your copy of LEDS, but may require additional data file to work properly:
- Define level properties, walls, bonus, etc. (if you see meta-buttons appearing and want to leave level properties definition for now, just press [SELECT] again).
- Add monsters to your level (if the tileset gets a grey background, you've accidentally entered monster edition mode. Press [R] to leave to regular edition).
Any comment on this software is welcome on the companion blog post.


 Vote for your favourite post
